The Glam NailZ Guide to E-Filing
The Best Nail Bits
& E-Files for Every
Service — Ranked
From prep to finish-out, these are the exact tools a 20-year nail tech uses to shape faster, work smarter, and protect her body.
Hand filing is a beautiful skill — but if you want a long career and half the service time, you need to understand your e-file. Not just how to turn it on, but which bit to grab, at what speed, for which service. This guide covers all of it.
Why E-File at All?
Using an e-file can dramatically cut your service time while reducing the wear and tear on your wrists and hands. After 20 years behind the nail desk, I can tell you — your body will thank you. But only if you’re using the right bits, at the right speed, with the right pressure (which is basically none).
The golden rule: if you’re pressing hard, your bit is done. A sharp, good-quality bit glides. Retire yours every 6 months minimum — sooner if you’re doing heavy acrylic fills or 3D work all day.
“You should be able to glide over the nail effortlessly. The moment you’re muscling it? That bit is telling you it’s retired.”
And before we dive in — dust extraction is non-negotiable in my kit. Acrylic dust is real, it accumulates, and your lungs matter. Keep one running during every single service.
Make Sure You…
- Rotate your bits — don’t rely on just one
- Own more than one of each type
- Disinfect after every single client
- File with intention and purpose
- Handle bits with care — never drop them
- Let your client know to relax their hands
- Use correct speed for the bit type
- Replace every 6 months minimum
Make Sure You Don’t…
- Drop your bits (bends them, ruins the run)
- Use bent or dull bits on clients
- Leave bits soaking in disinfectant too long
- Use high speed on a natural nail
Every Bit Type, Explained
There are five main categories of e-file bits you’ll use in your practice. Here’s what each one does, when to use it, and what to watch out for.
Mandrel
Low speed on natural nailHolds sanding bands and chamois buffers. Sanding bands are single-use — discard after every client. Great for natural nail prep and finish-out. Keep the barrel flush to the table to avoid heat rings. Come in extra fine through extra coarse.
Diamond Bits
Low speed · gentle pressureUsed in place of diamond bands. Options include flame, sciver, crosscut diamond, and pedicure bits. Work on the natural nail surface and finish-out. Warning: cheap bits have diamond glued on — they won’t last. True crosscut diamonds are infused into the bit.
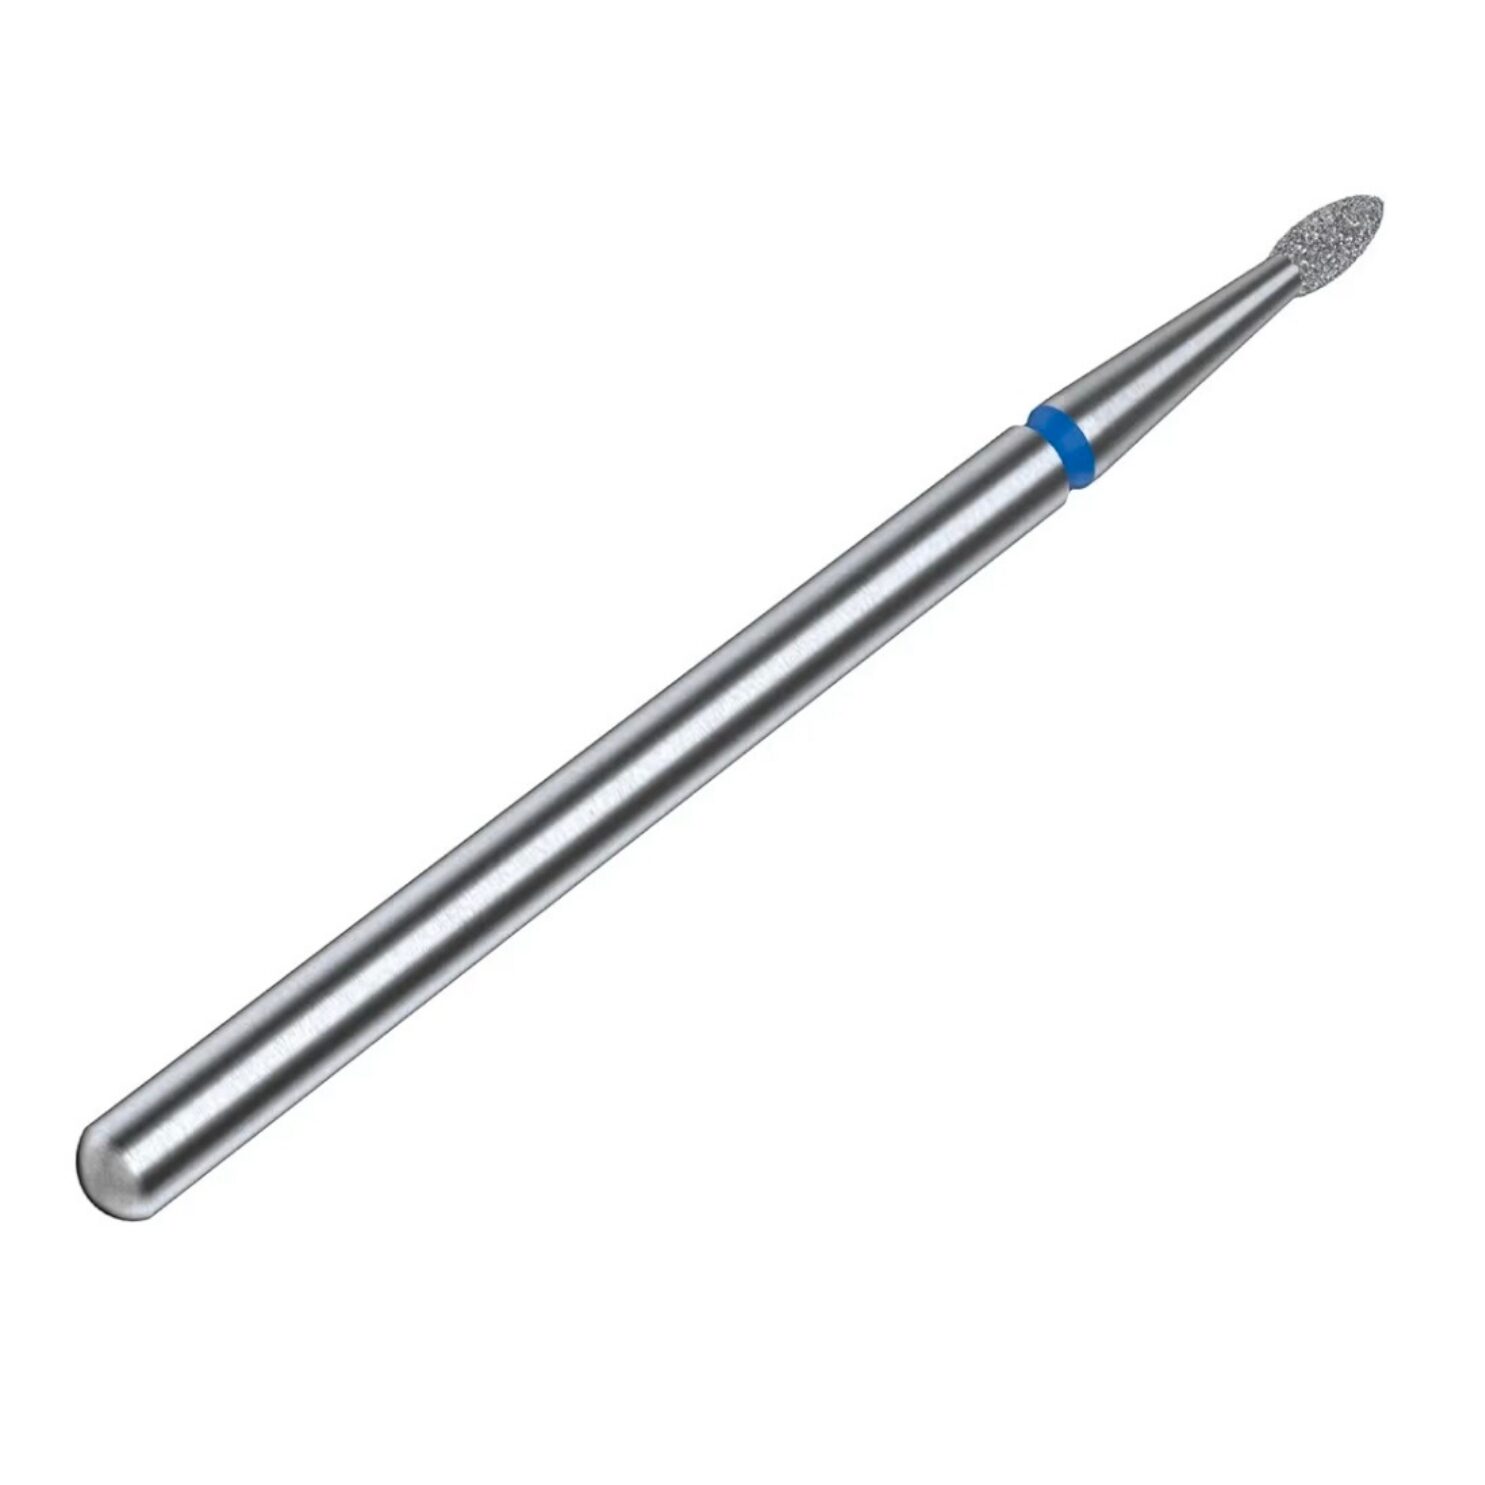
Carbide Bits
Min. 25,000 RPMShaped like cones, barrels, and needles. The teeth (called flutes) cut product away from enhancements. Sold in left- and right-handed models — direction matters! Use to refine acrylic, seal the cuticle area, and clean under the free edge.
Specialty Carbides
Min. 30,000 RPMMore aggressive, with pronounced flutes. Use these to take down nail length, remove 3D applications, thin down acrylic colors for a color swap. Come in safety shapes (football, flame bit) and barrel shapes. Must be used at 30K RPM minimum to avoid catching skin.
Ceramic Bits
Min. 25,000 RPMDon’t last as long as metal bits but are a great option. Refine acrylic, seal cuticles, clean under the free edge, and work on gel. Available in extra fine through extra coarse. Same rules: light pressure, correct speed, no muscling.
What the Color Bands Mean
Most quality bits are color-coded by grit. Here’s the key:
The Bits I Actually Use
I’ve tested more bits than I can count. These are the two I keep stocked and reach for constantly — one for prep, one for debulking.
Diamond Tornado Prep Bit
This is my go-to for prepping the natural nail. The tornado design moves product and debris away efficiently while the diamond grit gives you a clean, smooth surface without excessive pressure. Use it on low speed on the natural nail — let it do the work.
Shop my Amazon storefront for current pricing Shop This Bit →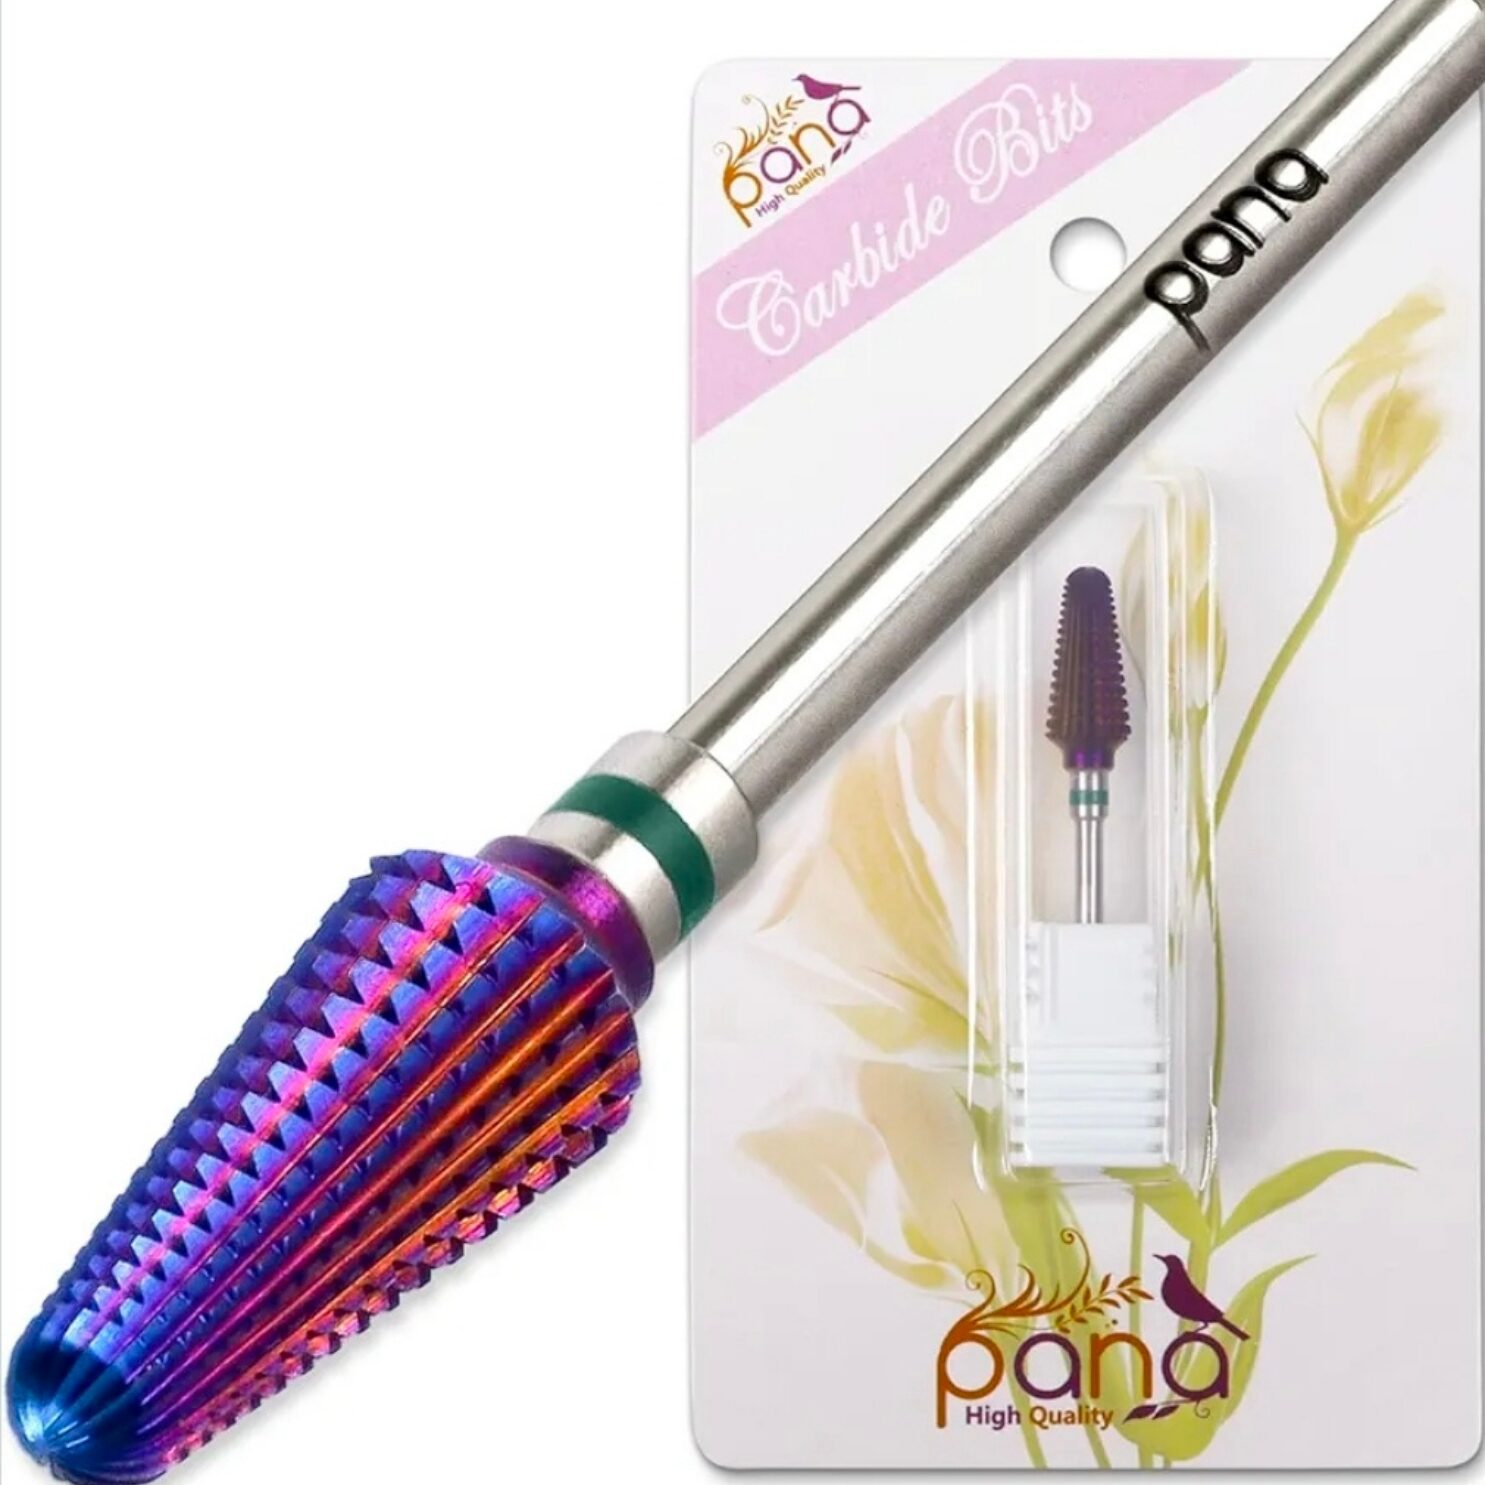
Tornado Bit for Debulking
When you need to take down product fast — whether that’s shortening length, thinning a fill, or prepping for a color swap — this is the one. The specialty carbide-style flutes handle heavy-duty debulking without the heat buildup of lesser bits. Run it at 30K RPM.
Shop my Amazon storefront for current pricing Shop This Bit →Technique by Service Step
Prepping the Natural Nail
Use a sanding band or crosscut diamond on your lowest speed setting. Many e-files skip or stall at the lowest setting — if yours does, do not bump up the speed to compensate. That will over-file. Instead, use the e-file only on settings it runs smoothly.
The word I use: tickle. Zero pressure. Let the tool work. Get into the cuticle area and sidewalls, and yes — you can use the arbor band to gently push back cuticles too.
Removing Lifted Acrylic
A medium carbide or diamond bit can cut a clean line just behind the lifted area. Be extremely gentle — these bits must never make contact with the natural nail plate. This step is precision work, not speed work.
Nail Shaping
Use an over-grip to adjust your client’s hand for a perfect side-profile view of the upper arch. Keep the base of the barrel against the free edge, the body against the apex, and the tip near the cuticle. You’re filing a continuous, connected arch — not sections.
Cleaning Under the Nail
Bump up to a slightly faster speed and hold the carbide bit flush under the free edge. This removes burrs and cleans the underside cleanly without thinning the nail.
Thinning the Nail Edge
Finish-out step: use your sanding band held flush under the free edge on a slow speed. This reduces thickness and cleans the underside of the nail for a polished finish.
Backfills — Cutting the French
Use a two-week carbide cutting bit at a 45-degree angle to cut the old product out at the smile line while leaving thickness at the tip. This lets you layer in a new color or glitter for a beautiful fade effect. No two-week bit? A coarse carbide can tap out the smile line too — just go gentle.
Cleaning Your Bits
True diamond bits can go in Barbicide between clients — especially after wet services — and should be scrubbed with soap and water. Diamond bits can also go in your sterilizer or autoclave.
Carbide bits and big-teeth specialty bits can be soaked briefly in acetone to loosen debris, then scrubbed clean with soap and water. Do not leave any bit soaking longer than needed.
“Disinfect after every client. Rotate your bits. Own multiples of each. These habits separate professionals from people who are just going through the motions.”
The E-Files: Best at Every Price Point
Your bits are only as good as your machine. Here’s how I think about the three price tiers — and the specific drills I trust at each level.
HALMAI HMC320
40,000 RPM powerhouse at a beginner price point. My pick for pedicure stations and mobile kits. Strong torque, compact build, handles thick toenails and heavy removals without bogging down.
Onail E-File
A serious upgrade for techs ready to invest in their craft. Smooth, reliable, and built for professional daily use. The Onail affiliate program is where I send my students first.
Saeyang Marathon K35 Mini
This lives permanently at my nail desk. Ultra-smooth, never vibrates, never skips. If you’re doing detailed work every single day, this is the investment that pays off.
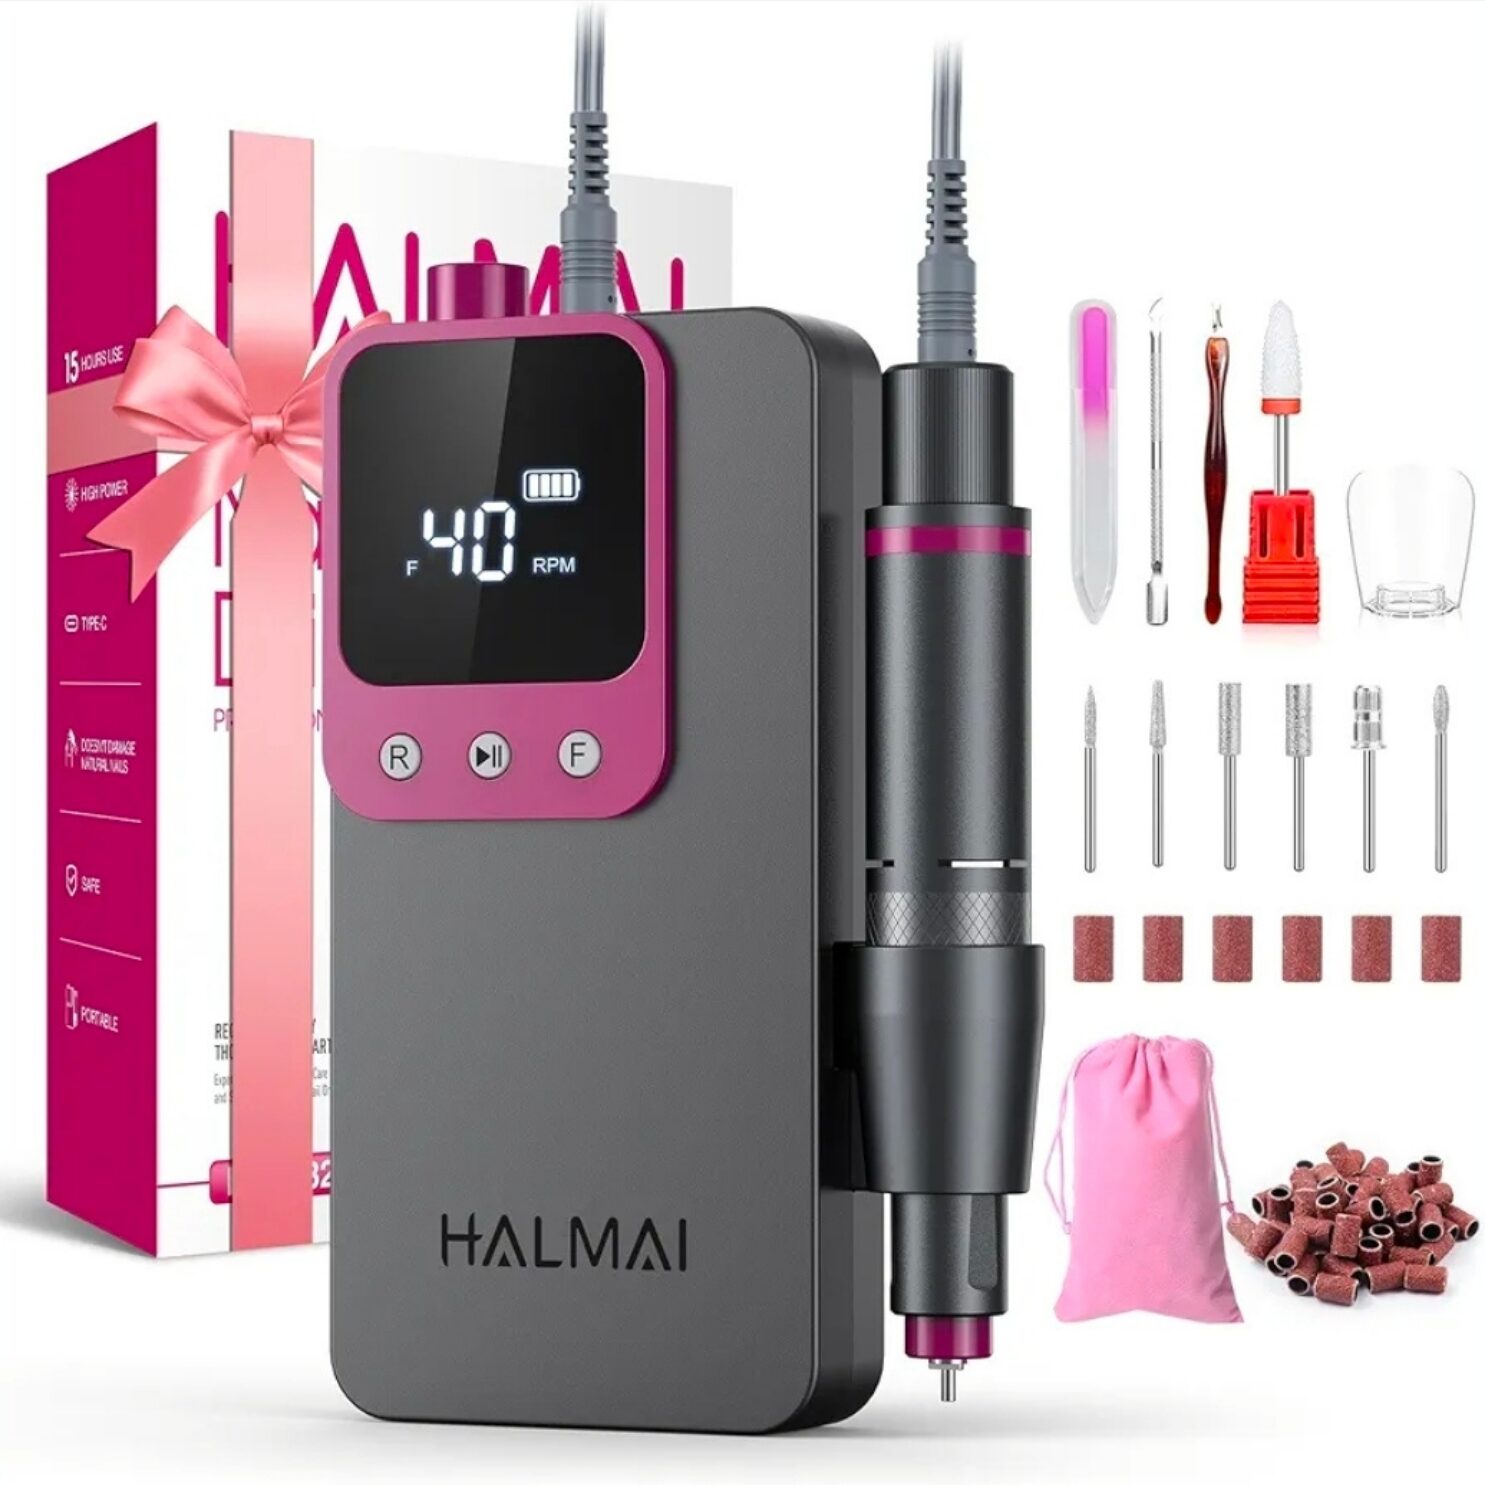
HALMAI 40,000 RPM HMC320
Don’t underestimate this one. Budget-friendly, powerful torque, compact enough for your mobile kit or pedicure station. Handles thick toenails, removals, and heavy-duty services without losing speed. Perfect entry point for nail techs building their kit without breaking the bank.
Beginner-friendly price · High power output Shop HALMAI on Amazon →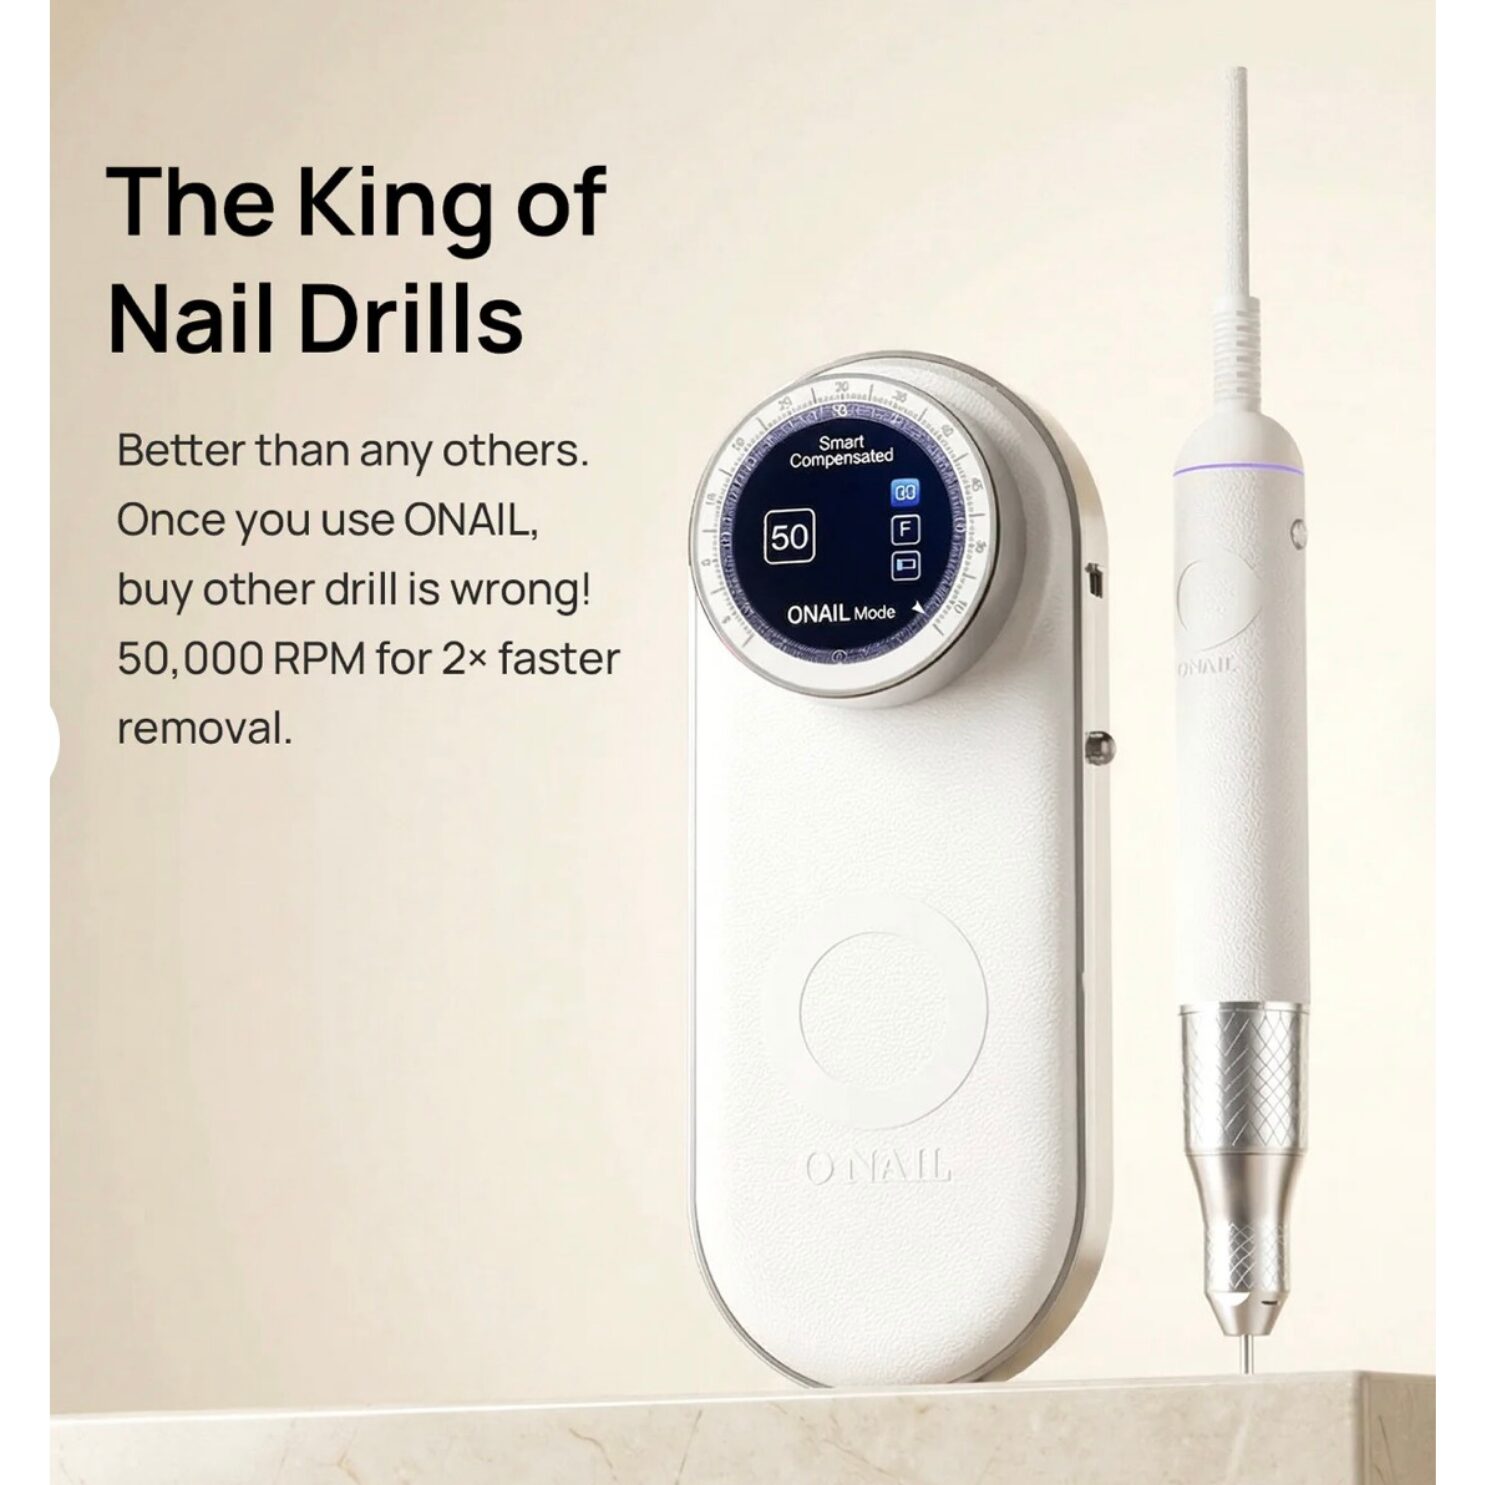
Onail E-File
The Onail is a professional-quality drill built for daily use. Consistent RPM output, smooth performance, and a machine that keeps up with a full book of clients. This is what I recommend when students are ready to make a serious investment in their toolkit.
Professional grade · Built for daily use Shop Onail →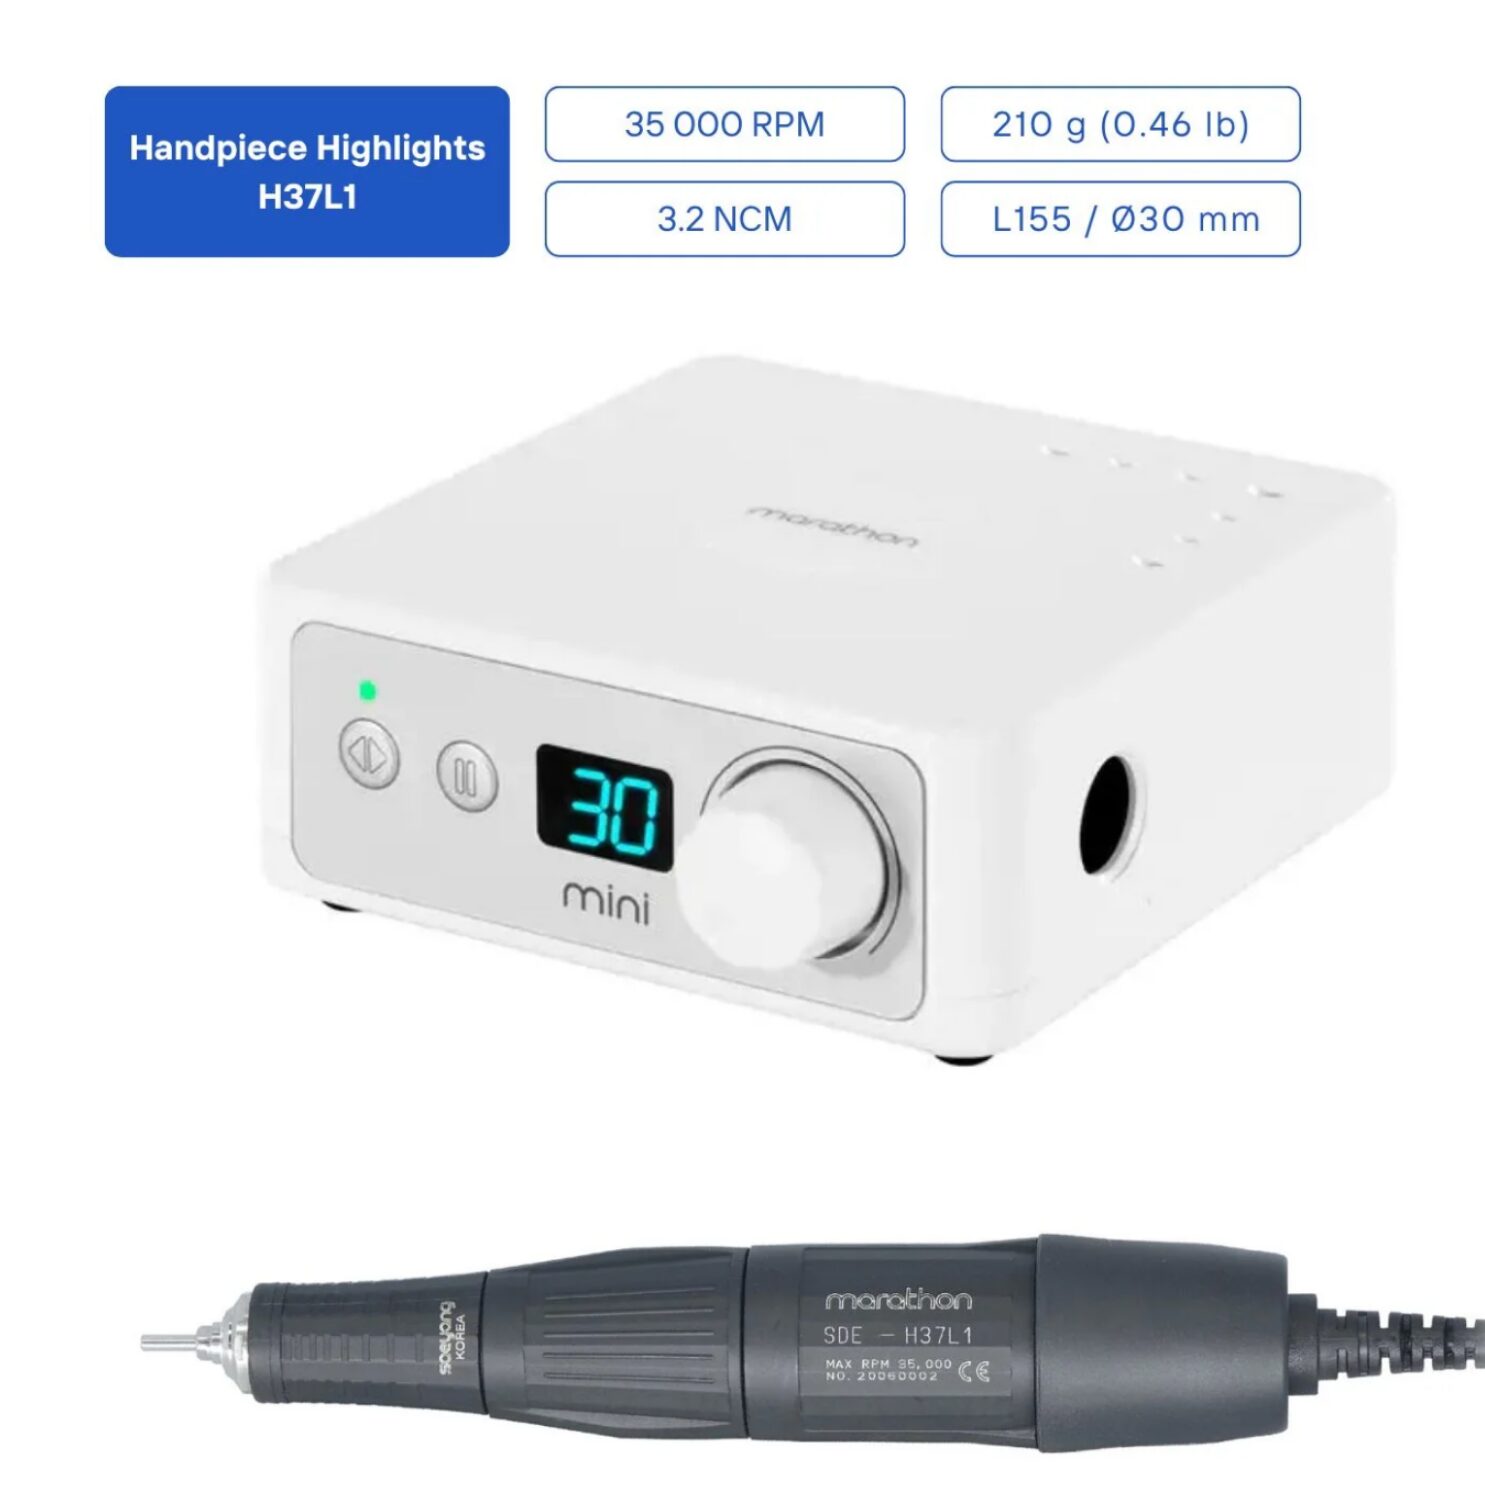
Saeyang Marathon K35 Mini
This is the one that lives at my desk — and has for years. Smooth, consistent, quiet, and powerful. It never vibrates, never skips, and handles any service from soft prep to full product removal. If you’re doing this professionally every day, this is the drill that lasts.
Pro-level investment · Longterm durability Shop Saeyang at Fox Nails →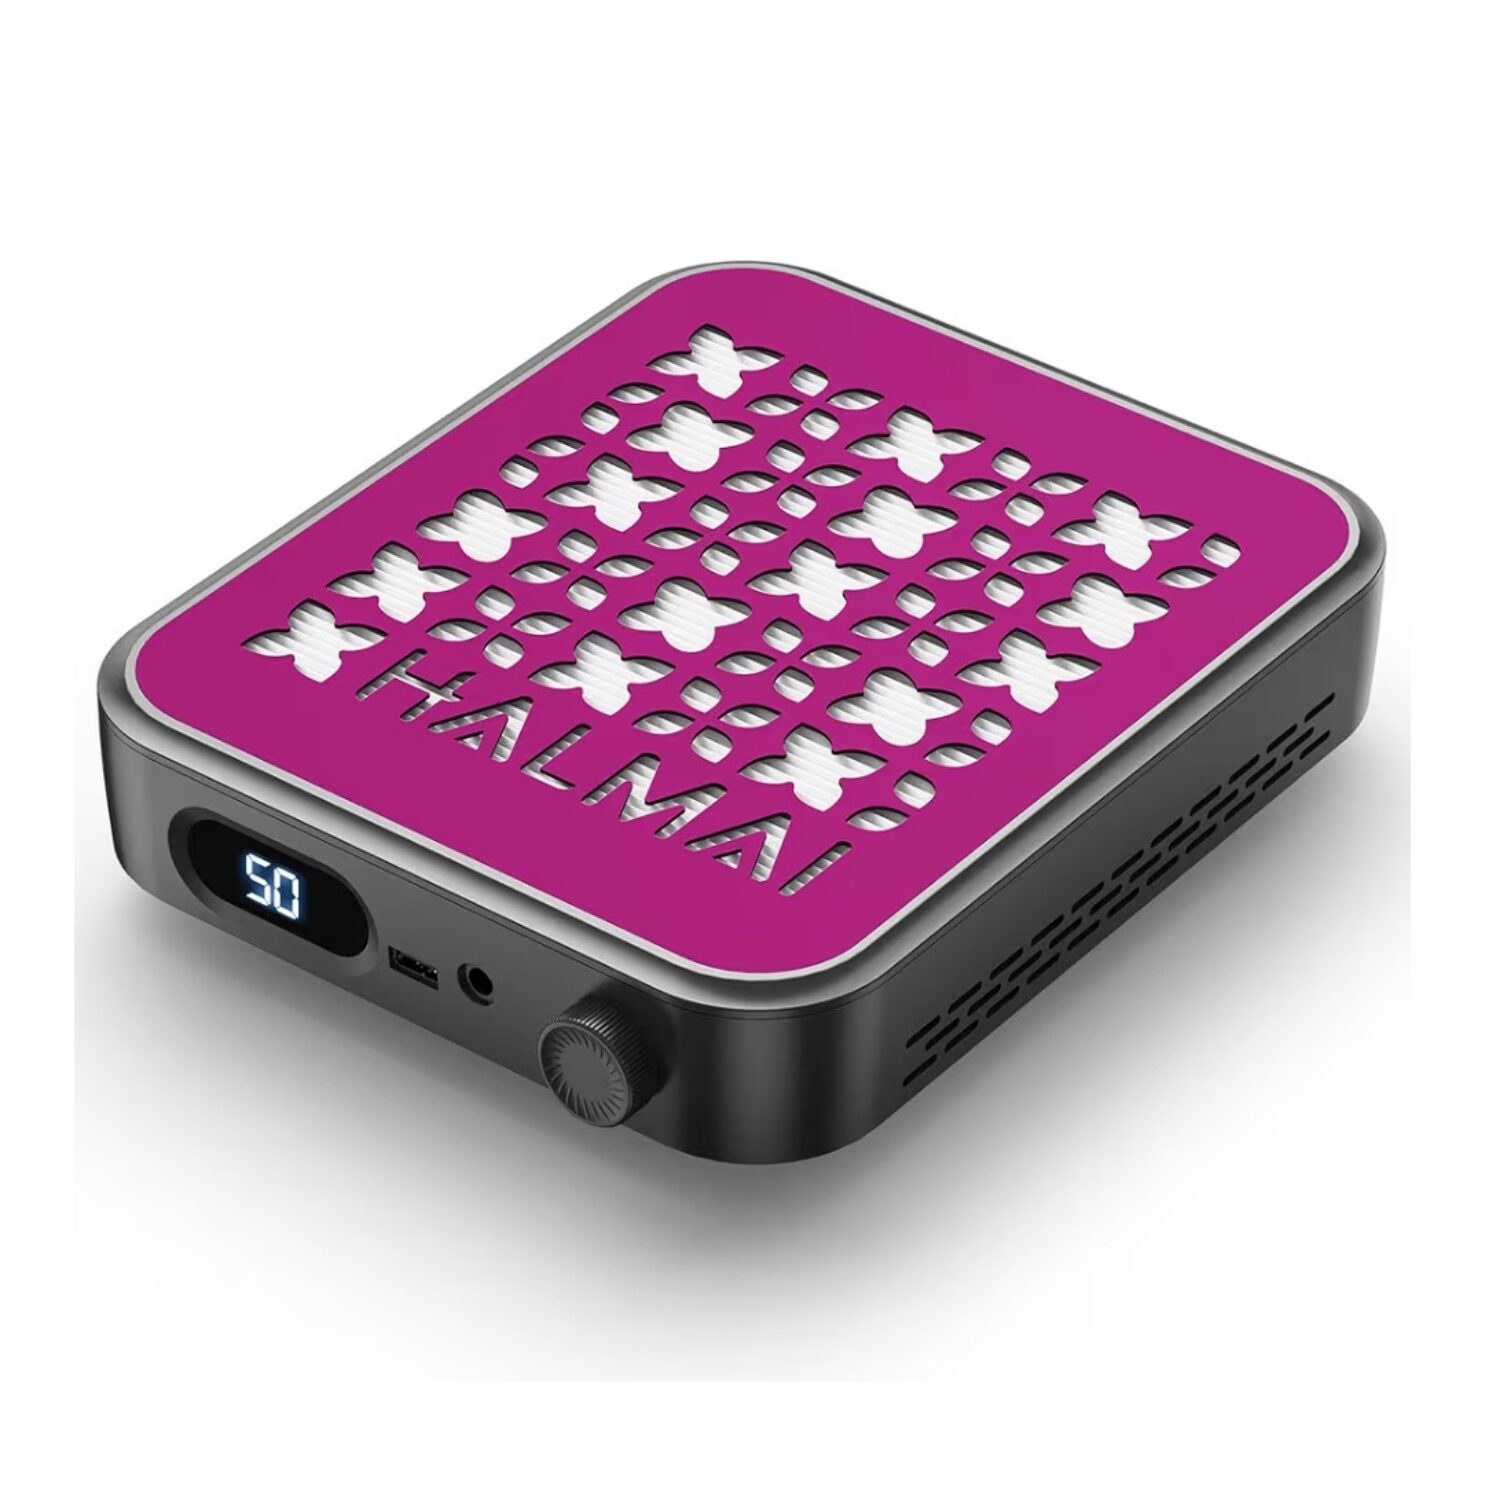
Watch the Technique in Action
Words only go so far. Here are three of my most-watched e-file technique videos — prep bits, carbide bits, and finish filing — so you can see exactly how this should look in real time.
Prep Bits Introduction
Watch how to use your mandrel and crosscut diamond for natural nail prep — the right speed, the right pressure, the right technique.
Carbide Bits Introduction
See exactly how carbide flutes work on product — direction, speed settings, and how to avoid heat during a fill or shape.
Finish Filing Techniques
The final step that separates a good set from a great one — how to thin the edge, clean underneath, and create a flawless finish.
Best LED Nail Lamp for Nail Techs: What You Need to Know About UV Safety, Curing Speed & the Lamps I Actually Use in My Salon
Get stunning results without the risk — everything you need to know about choosing the right lamp for your setup.
Read the Post →Download the Nail Bits Guide
Get the full PDF guide to keep as a reference — bits, speeds, cleaning, and everything in between.
Download the Guide →